Step 1: Foamcore Bases
First, cut some rectangles of foamcore board about 6 inches in length and 1 inch wide. Note that these were not cut very neatly(foamcore is a pain to cut), but in the end you'll see that this really doesn't matter.
Step 2: Rounding and Beveling the Foamcore Bases
Next you need to round off the corners of the square bases with either scissors or a hobby knife(such as x-acto knife or utility knife). You'll also want to bevel the edges at an angle. As shown in the second picture. Make sure your hobby knife has a fresh blade- foamcore hates dull blades! At this point peel off as much of the top layer of paper from the foamcore as you can(the top layer is the side with smaller surface area once the beveling is done).
Step 3:Placing the Wooden Posts
Now it's time to start building the fence! Begin by pre-"digging" four(or three) post holes using your x-acto knife or a small dremel. For posts I suggest "matchsticks" that are available at most craft stores. No, they're not really matches, just wooden bits about the size and shape of wooden match(but a bit longer). They are cheap alternatives to balsa wood- but that is your back up if you can't locate the sticks that I used. You'll need to cut each matchstick in two. Go ahead and place a drop of glue in each of the holes you created and then insert the sticks(half sticks). I prefer Weldbond Glue(available at Michael's or on Amazon in the USA, plentifully available in Canada as I understand it), but any 'white glue' such as Elmer's will be fine.
Step Four: Gluing on the Wooden Slats
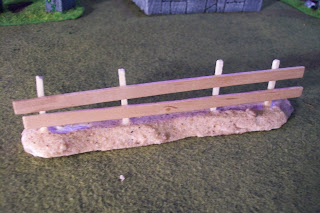
At this point you can complete the structure of the fence by gluing on the horizontal slats. You could use any balsa wood but the cheap alternative I prefer are "coffee stirrers" or "Skinny Sticks" such as shown in the top picture. They are almost 6" in length(that's why we cut our foamcore to about that length in Step 1). I intentionally chose a picture of where one of the slats has 'dipped' and is not straight to point out that, when making multiples of a similar terrain item, variation is always good. Perhaps the top slat has come lose, or some Iron Kingdoms farmer hastily erected it due to wandering livestock!
Step Five: Texturing the Bases
Now we must give the bases a "dirt" texture with a nice coat of sand(much like you might use to base a miniature). Be careful that the sand you buy has an irregular and variable grain to it(like sand on the beach). Hardware store bags of sand are usually best(but avoid white "Play Sand"). I coat the base with "Mod Podge", a transparent glue-like sealer from craft stores, and then dip the piece into my sand...shaking off the excess. You could just easily water down some white glue and use that as your adhesive. I also choose to glue some small pebbles around some of the fences for a little variation- it makes for a nice effect on the completed project.
Step Six: Painting on the Basecoat and Highlights
There are a plethora of ways to go about painting but I'll give you a simple method. My first rule of painting terrain items is: use inexpensive paint. Terrain pieces are large, so you'd quickly use up your P3 or other miniature paints to paint them up. I suggest cheap but reliable "craft paints" such as those of the (in the U.S) Folkart brand. If you've got a paint that you use for dirt landscapes for your terrain board, you'll want to use that. I paint all of the fences(and their bases a basic brown).
Now for some quick detail you can use a lighter brown and then a tan to highlight the base. I use only the tan on the wood of the fence itself. Also of note are the pebbles(now "rocks") that I paint up in various shades of grey. For a little variation you might put some high grass sprigs on some of the bases(as shown above). Yuo can use "Field Grass" scenic material, or, as I did, leftovers from my wife's old makeup brush(yes, I asked first!).Step Seven: Flocking the Base
For a final detail now we flock the base using static grass. There are many varieties you can choose from. I water down some Elmer's(or other white glue) and paint it on with a brush in patches around the base. In general, try to apply the grass on the lower elements of the base and only sparingly under the fence. Once you've painted on your glue, dip the piece into a container of your static grass, invert the piece, tap on it briskly to eject lose fibers, and you are done!
You can see some of the finished pieces integrated onto a gameboard. The great things about small terrain pieces such as fences, stone walls, crates, barriers and trench sections is your ability to reconfigure them to create different types of situations on your battlefield.
If you have any questions, feel free to comment or email me!


Thanks for the writeup - I'll be borrowing this method for the next stage of my own board.
ReplyDeleteNo problem, Von. Glad to hear it is of some help. Good luck with your project.
ReplyDeleteWhy avoid play sand? I think I've been using that...hehehe.
ReplyDelete@Felix
ReplyDeleteGood question, Felix...I needed to be more precise with my description of 'play sand'. You can see this article where I describe the different varieties and what one wishes to avoid...
http://blitzbattles.blogspot.com/2011/08/basing-101-dirt-texture.html
We need to get some hardware for our custom double gates and put a few finishing touches on, but basically we are done.link fence
ReplyDelete